
Tutorial: Creating ASP.NET Core + Angular 4 application with connection to MongoDB in Ubuntu
List of Related Tutorials:
- Part 1. Creating basic ASP.NET Core + Angular 4 application in Windows 10
- Part 2. Creating ASP.NET Core + Angular 4 app in Docker connected to SQL Azure DB
- Part 3. Creating ASP.NET Core + Angular 4 app with connection to MongoDB in Ubuntu
In the first and second parts of our tutorial, we developed an Angular 4 + .NET Core solution in Windows environment. This time we’ll extend our proof of concept to work with .NET Core in Ubuntu.
In this tutorial you’ll learn:
- Running MongoDB (NoSQL database) as an alternative to MS SQL (SQL database)
- Packing MongoDB in a Docker container
- Changing our Angular 4 + .NET Core application to be compatible with MongoDB
- Packing Angular 4 + .NET Core application to another Docker container
Before we start, you’ll need to install Git, NodeJS, Docker, .NET Core SDK, and Visual Studio Code with C# extension in the Ubuntu environment.
Initial Preparations
IMPORTANT! In this part of the article, we’ll be executing all commands in a terminal with root privileges. To run a terminal with root privileges, run sudo gnome-terminal in a terminal.
At first, you should execute git clone <your repository url> for our Angular 4 + .NET Core application, which we created in the previous parts of our tutorial (Part 1, Part2). Run it, using a familiar set of commands:
npm install

webpack

dotnet run
If you open a link, suggested by dotnet run instruction, you will see the same table as in a Windows environment. That means the code, which we created in Windows environment, will work in Ubuntu without any extra efforts.
Running MongoDB Server
It’s pretty easy to start working with MongoDB if you use Docker. Just run the following instruction in the terminal to assemble a Docker container with MongoDB inside:
docker run --name UbuntuMongoInstance -p 5533:27017 -d mongo
This instruction runs container named UbuntuMongoInstance based on Mongo image from a common repository and maps the exposed Port 27017 (the Mongo port) to the current host environment Port 5533.
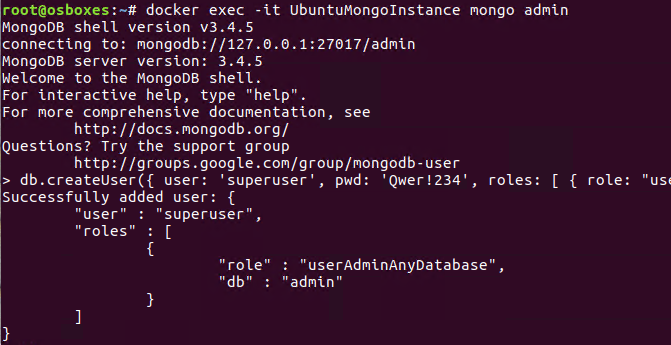
The MongoDB container is up and running. We will need to run MongoDB shell in order to connect to the database server and create a new user, who will connect to the database from our application:
docker exec -it UbuntuMongoInstance mongo admin

db.createUser({ user: 'superuser', pwd: 'Qwer!234', roles: [ { role: "userAdminAnyDatabase", db: "admin" } ] });
The database server is ready and it’s time to create a new database with a table and populate it with data.
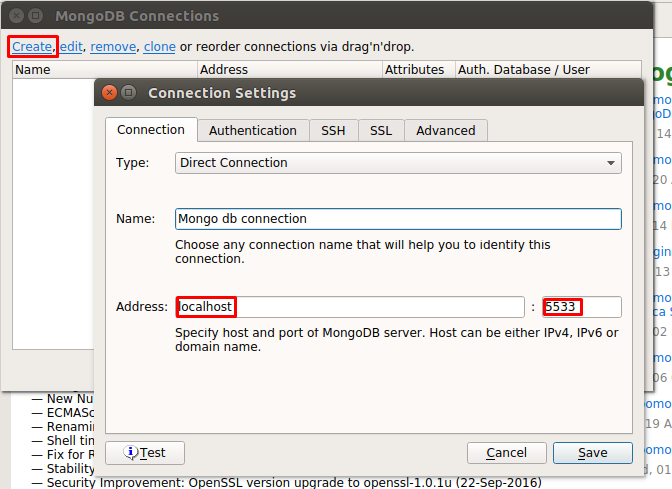
For this purpose, we will use Robomongo – a very popular GUI tool for MongoDB.
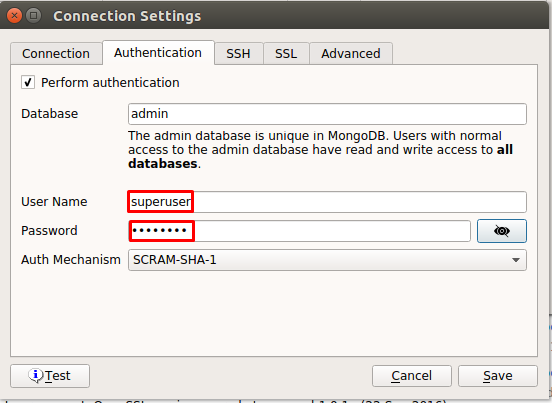
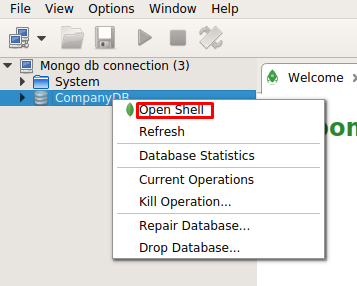
In the screenshots below, you can see how to connect to our MongoDB server, running in the Docker container:
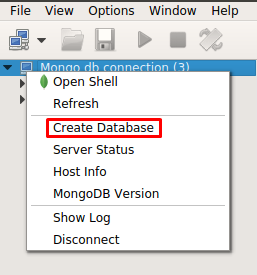
The connection is established and we need to create a new database, named “CompanyDB”:

Let’s open the shell and run an “INSERT” instruction:
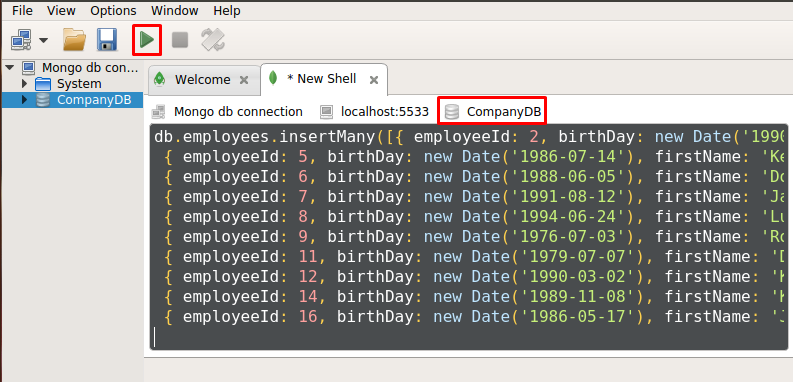
We use “insertMany” instruction to insert data into the table. Data is presented as a JSON array. The “Employees” table will be created automatically. Please note that data in the JSON array is very similar to the data, which we used in the previous part, as we wanted to minify changes to our frontend part:
db.employees.insertMany([{ employeeId: 2, birthDay: new Date('1990-11-05'), firstName: 'Orlando', lastName: 'Gee'},

 { employeeId: 5, birthDay: new Date('1986-07-14'), firstName: 'Keith', lastName: 'Harris'},

 { employeeId: 6, birthDay: new Date('1988-06-05'), firstName: 'Donna', lastName: 'Carreras'},

 { employeeId: 7, birthDay: new Date('1991-08-12'), firstName: 'Janet', lastName: 'Gates'},

 { employeeId: 8, birthDay: new Date('1994-06-24'), firstName: 'Lucy', lastName: 'Harringto'},

 { employeeId: 9, birthDay: new Date('1976-07-03'), firstName: 'Rosmarie', lastName: 'Carroll'},

 { employeeId: 11, birthDay: new Date('1979-07-07'), firstName: 'Dominic', lastName: 'Gash'},

 { employeeId: 12, birthDay: new Date('1990-03-02'), firstName: 'Kathlee', lastName: 'Garza'},

 { employeeId: 14, birthDay: new Date('1989-11-08'), firstName: 'Katherine', lastName: 'Harding'},

 { employeeId: 16, birthDay: new Date('1986-05-17'), firstName: 'Johnny', lastName: 'Caprio'}])
Let’s take a look at the current state of the shell:
Our database is ready. Now we will push our image to the Docker hub.
Save MongoDB in Docker Hub
While this procedure is not obligatory, we wanted to commit a stable version of our database in order to be able to rollback if something goes wrong.
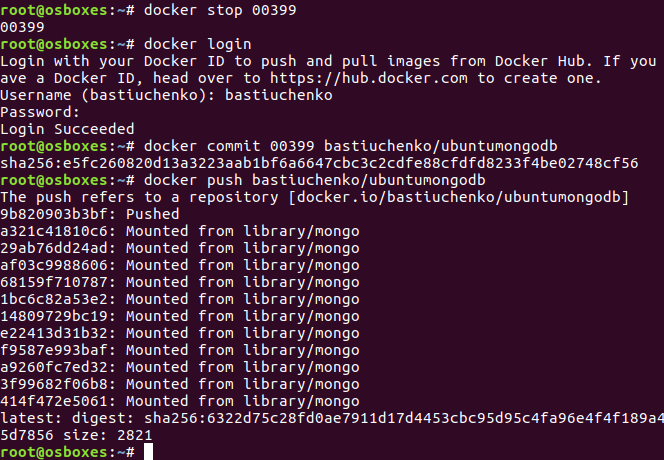
Run docker ps instruction to find out the container ID:

Run the following commands to commit and push your image to the Docker Hub:
docker login

docker commit 00399 /ubuntumongodb

docker push /ubuntumongodb
As you may see, we used a magic “00399” code. It’s a short version of our container ID. You don’t need to write the whole ID –just insert first symbols, which can identify the container ID and are unique within the list of images in your environment:
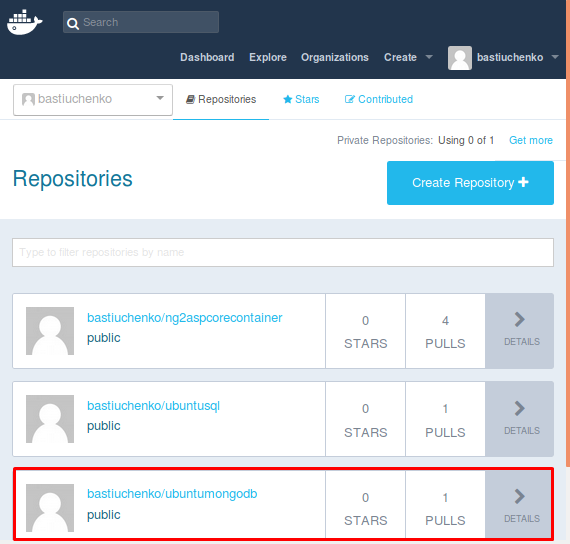
Now we can see a new block in our repository:
Before we go on, we’ll need to make a few adjustments.
Project Adjustment
We’ll need to change our project so it can connect to MongoDB database and display retrieved data in a browser.
Open *.csproj file and put the following line to the “ItemGroup” section:

We should specify a database connection string, and appsettings.json file is a good place for it.
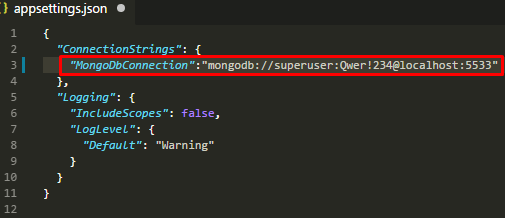
Explanation:
- superuser – a user we created in MongoDB shell via terminal
- Qwer!234 – user’s password
- localhost:5533 – the hostname and the port of MongoDB server, which we mapped in docker run
We’re finished here, and a few more steps are left: to tune our backend and frontend.
Changing Backend
At first, we should create a database context, where we’ll adjust connection to MongoDB.
Create a “Service” folder and a MongoContext.cs file in this folder:

Now, we’ll create a MongoClient instance based on a connection string, which we’ll take from the appsettings.json file later. Add the following code to the file:
using MongoDB.Driver;
namespace Ng2AspCore.Services
{
	  public class MongoContext
	{
    	    public readonly IMongoDatabase db;
    	      public MongoContext(string connectionStr)
         	{
        		var mongoClient = new MongoClient(connectionStr);
        		db = mongoClient.GetDatabase("CompanyDB");
    	       }
	}
}
The service for the database connection is ready and we need to initialize it as a singleton service.
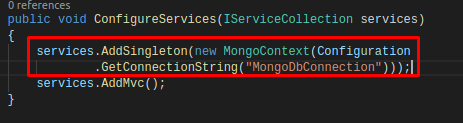
Open the Startup.cs file and insert the following line, which will start “MongoContext” as a singleton:
services.AddSingleton(new MongoContext(Configuration.GetConnectionString("MongoDbConnection")));
Create “EmployeeMongo.cs” file in the DBModel folder. This file will contain a model, which reflects “employees” table in “CompanyDB” database:
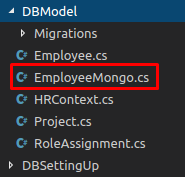
…and insert the following code:
using System;
using MongoDB.Bson;
using MongoDB.Bson.Serialization.Attributes;

namespace Ng2AspCore.DBModel
{
	[BsonIgnoreExtraElements]
	public class EmployeeMongo
	{
    	    [BsonElement("employeeId")]
    	    public int EmployeeId  { get; set; }
    	    [BsonElement("firstName")]
    	    public string FirstName  { get; set; }
    	    [BsonElement("lastName")]
    	    public string LastName  { get; set; }
            [BsonElement("birthDay")]
    	    public DateTime BirthDay { get; set; }
	}
}
Please note that [BsonIgnoreExtraElements] and [BsonElement(…)] attributes are necessary to bind retrieved data from MongoDB correctly.
The last step of our backend part adjustment will be to create a WebAPI controller.
Create “EmpMongoController.cs” file in the “Controllers” folder:
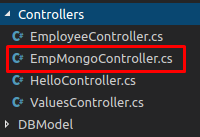
…and insert the following code:
using System.Collections.Generic;
using Microsoft.AspNetCore.Mvc;
using MongoDB.Bson;
using MongoDB.Driver;
using MongoDB.Driver.Linq;
using Ng2AspCore.DBModel;
using Ng2AspCore.Services;

namespace Ng2AspCore.Controllers
{
	[Route("api/EmployeeMongodb")]
	public class EmpMongoController: Controller
	{
    	      private MongoContext context;
    	      public EmpMongoController(MongoContext context)
    	      {
    	          	this.context = context;
    	      }

    	      [HttpGet("GetAll")]
    	      public IEnumerable GetAllEmployeesFromMongodb()
    	      {
    	       return context.db.GetCollection("employees")
    	      .Find(x=>x.LastName.StartsWith("C")).ToList();
    	   }
      }
}
Let’s take a look at the class constructor. It has one MongoContext context parameter. We will receive the value of this variable through Dependency Injection, which .NET Core provides out-of-box when we use services.AddSingleton method. As an example of a query to MongoDB, we get all employees with a “GetAllEmployeesFromMongodb” action if their last name starts with “C” character.
Changing Frontend
Open employee.service.ts file, which you can find in <project root>\src\app\employees\employee.service.ts folder.
Change the existed endpoint URI to the new endpoint URI:
- from api/Employee/GetAll
- to /api/EmployeeMongodb/GetAll
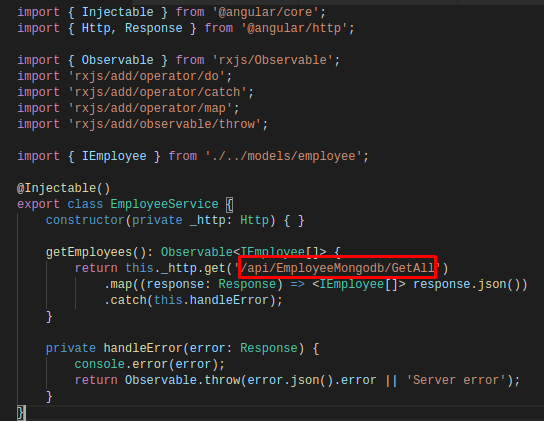
No other changes should be done to the frontend part, as we haven’t changed the model of our data.
Changing “Hello World” Message (optional)
This is a cosmetic change to show that we are in Ubuntu environment.
Go to HelloController.cs and change our “Hello World” message:
- From Hello Angular4 and ASP.NET Core from Windows 10
- To Hello Angular4 and ASP.NET Core from Ubuntu
Running our Application
Now, our MongoDB database is running within the Docker container and our Angular 4 + .NET Core application runs within our Ubuntu host environment. Let’s launch all that:
webpack

dotnet run
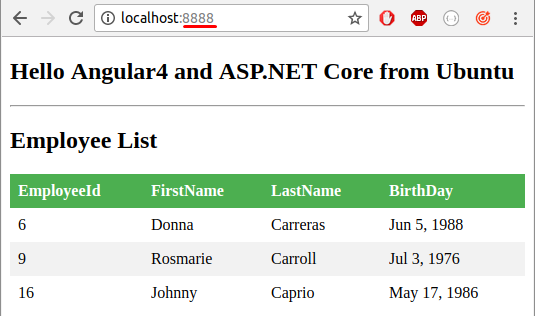
Open your browser to check the result:
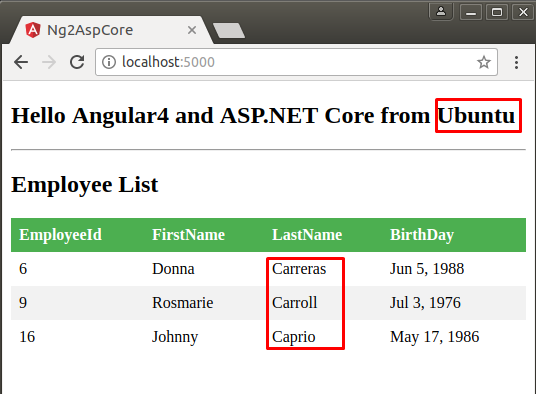
As we can see, all changes have appeared and we can see the employees list according to the query.
Interoperation between Containers
In the last neat trick, we will show you how to establish a connection between two Docker containers.
We’ll connect our Angular 4 + .NET Core application to the Mongo DB Docker container. To do that, we’ll need to deal with one small matter.
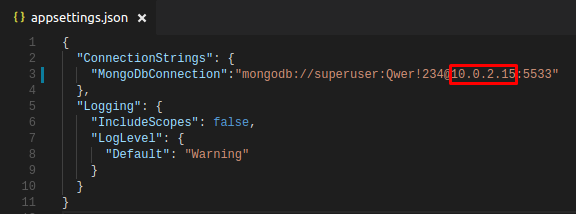
Previously, we’ve coded our Angular 4 + .NET Core application to connect to the database according to the connection string, specified in appsettings.json file:
“mongodb://superuser:Qwer!234@localhost:5533”
The Angular 4 + .NET Core application thinks that “localhost” is the Docker container environment where the application is running.
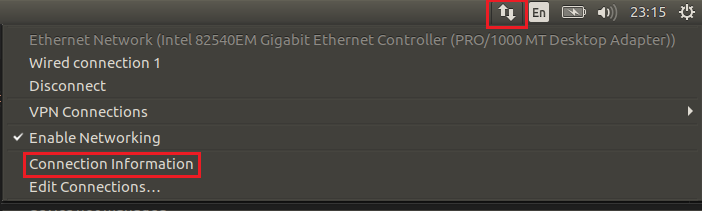
We need to connect the application to another Docker container, where our MongoDB database is deployed now, and get rid of the “localhost”. We can specify the IP Address of the host environment in order to connect to MongoDB database in the container. Press “arrows” button on the top panel of Ubuntu GUI and select “Connection Information”:
You can find the IP Address in a popup window:
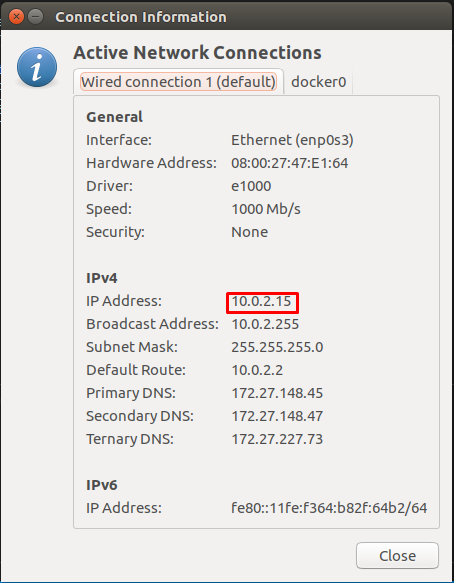
Let’s change “localhost” to the IP Address in the connection string:
Build the application again and pack it in a Docker container:
dotnet build

dotnet publish

docker build bin/Debug/netcoreapp1.1/publish -t ng2aspcorecontainer_linux

docker run -it -d -p 8888:80 ng2aspcorecontainer_linux
We mapped Port 8888 to the exposed port 80 in the container.
Run docker ps to check, which containers we have:

Run the application using the port, which we assigned:
As you can see, everything works fine and both containers interoperate with each other.
We’ll push our recently created container to the Docker hub just to make sure current progress is saved:
docker commit bf28 /ng2aspcorecontainer_linux

docker push /ng2aspcorecontainer_linux
You can find the final version of this proof of concept in our GitHub Repository.
With this article, we end our set of tutorials, dedicated to building Angular 4 + .NET Core solutions with Docker and open-source cross-platform technologies stack. For more information, please refer to the first and the second parts of our tutorials.
![Pros and Cons of CEA [thumbnail]](/uploads/media/thumbnail-280x222-industrial-scale-of-controlled-agriEnvironment.webp)
![BPO in Telecom and BFSI [Thumbnail]](/uploads/media/thumbnail-280x222-ways-business-process-outsourcing-bpo-can-help-telecom-bfsi-and-other-industries-advance.webp)
![Cloud-Native Maturity Model Assessment [thumbnail]](/uploads/media/thumbnail-280x222-what-Is-the-cloud-native-maturity-model-definition-and-assessment-criteria.webp)
![Power Platform for Manufacturing [Thumbnail]](/uploads/media/thumbnail-280x222-power-platform-for-manufacturing-companies-key-use-cases.webp)

![Containers vs VMs for Microservices [thumbnail]](/uploads/media/thumbnail-280x222-containers-vs-vms-what’s-better-for-microservices.webp)
![Accelerated Development with Azure DevOps Toolset [thumbnail]](/uploads/media/thumbnail-280x222-how-to-improve-developer-velocity-with-azure-devops.webp)
![10 Lessons Learned: AWS Migration [Thumbnail]](/uploads/media/thumbnail-280x222-10-lessons-learned-on-aws-migration.webp)
![Cloud FinOps Implementation Roadmap [Thumbnail]](/uploads/media/thumbnail-280x222-cloud-finops-why-you-need-it-and-how-to-get-started.webp)
![Challenges of Low-code vs Custom [TN]](/uploads/media/thumbnail-280x222-how-to-overcome-the-challenges-of-low-code-and-custom-solutions-development-expert-advice.webp)