
Tutorial: Creating ASP.NET Core + Angular 4 app in Docker container connected to SQL Azure Database
List of Related Tutorials:
- Part 1. Creating basic ASP.NET Core + Angular 4 application in Windows 10
- Part 2. Creating ASP.NET Core + Angular 4 app in Docker connected to SQL Azure DB
- Part 3. Creating ASP.NET Core + Angular 4 app with connection to MongoDB in Ubuntu
In the second part of our tutorial, we intend to achieve the following:
- to create an MS SQL database in Azure SQL Server
- to connect to the created database and retrieve data using Entity Framework Core
- to display received data using Angular 4
- to wrap .NET Core solution in a Docker container
- to deploy the Docker container to Microsoft Azure
Let’s have a closer look at each of these steps.
Creating a Database
While we could use an on-premises SQL Server, we want to make our proof of concept more appealing, portable and relevant to modern challenges. That’s why we will move our MS SQL database to Azure SQL Database.
First, log in to Microsoft Azure Portal. If you don’t have a subscription, you can start a trial one.
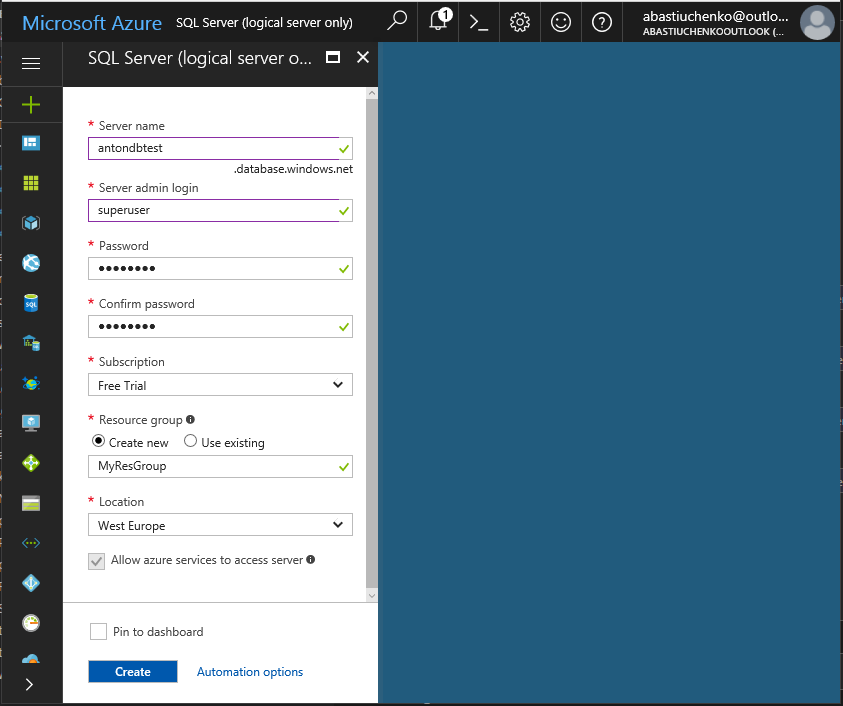
Click on a big plus on the left panel of Azure Portal, select SQL Server and fill all required fields as shown below:
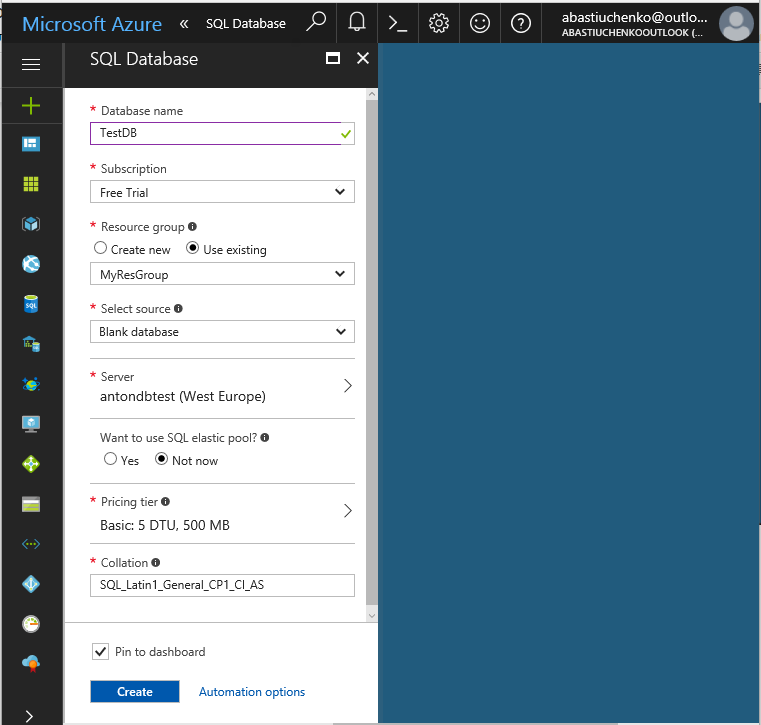
Now create a database where you intend to store data – check the screenshot below for an example. Please note that in “Server” field we selected the server name, which we created previously as seen on the screenshot above.
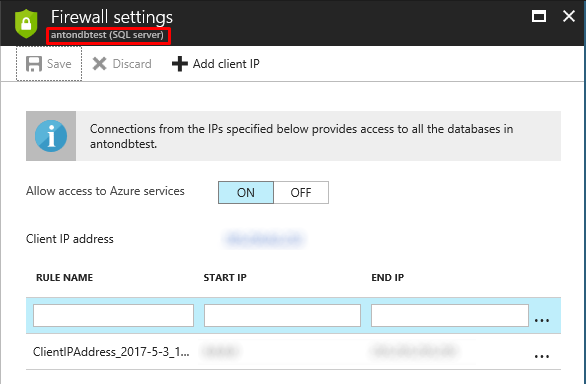
The next step would be to adjust the Firewall settings of your database:
Finally, our database is ready for use, however, it’s still empty.
Let’s go to our NET Core + Angular 4 application, which we created in the first part of our tutorial. In the previous version of ASP.NET, you were probably using web.config to store connection string. The appsettings.json file is an analog of the web.config file in .NET Core. It may seem complicated to assemble a connection string in order to connect to Azure Database but Azure helps us with it.
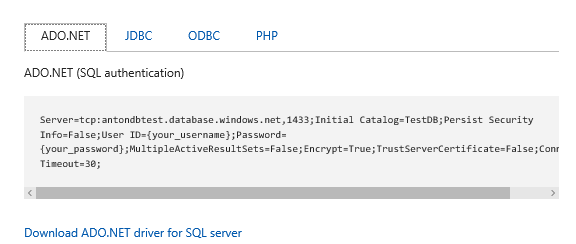
Open your Azure database and select “Quick start -> Database connection string for popular platforms and APIs” option as shown below:
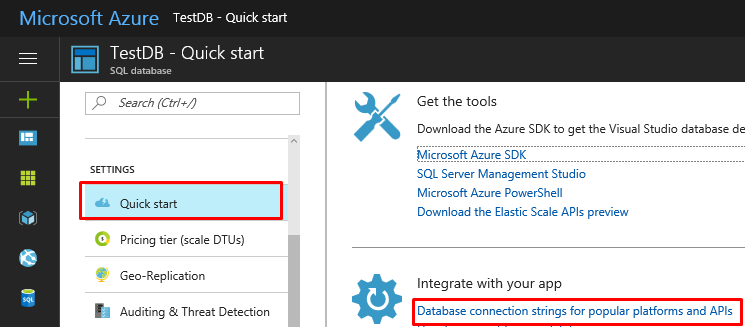
Now you can see your database connection string:
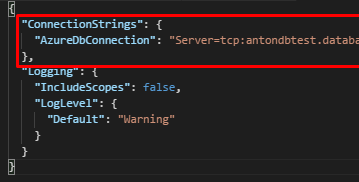
Now open appsettings.json file and specify the connection string there:
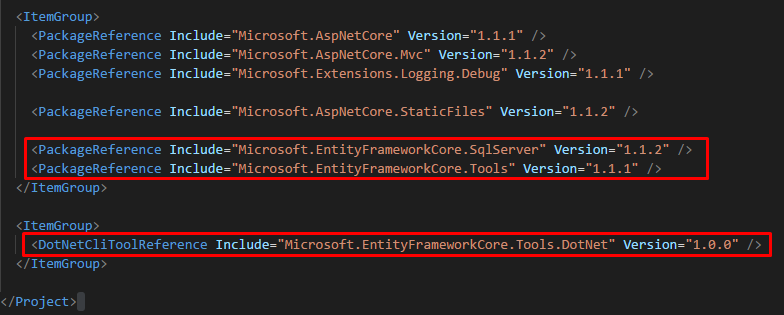
Insert the following lines to *.csproj project file to use Entity Framework Core:
<PackageReference Include="Microsoft.EntityFrameworkCore.SqlServer" Version="1.1.2" />

<PackageReference Include="Microsoft.EntityFrameworkCore.Tools" Version="1.1.1" />

<DotNetCliToolReference Include="Microsoft.EntityFrameworkCore.Tools.DotNet" Version="1.0.0" />
and run dotnet restore to download these packages.
Now let’s move to the next step.
DataBase Model Creation
We should prepare POCO classes for our Entity Framework Code first model. Let’s create a model using DataAnotation and FluentAPI as shown below:
We’ll skip writing an amassment of code for these classes – just download the code from our Git Repository.
Now create a DBModel folder and copy the files from the repository to the folder as shown below:
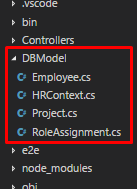
Review the HRContext file, which contains DbContext description:
using Microsoft.EntityFrameworkCore;
using System.Collections.Generic;

namespace Ng2AspCore.DBModel

{
    public class HRContext : DbContext

    {
        public HRContext(DbContextOptions<HRContext> options): base(options) { }


        public DbSet<Employee> Employees { get; set; }
        public DbSet<Project> Projects { get; set; }
        public DbSet<RoleAssignment> RoleAssignments { get; set; }
    }
}
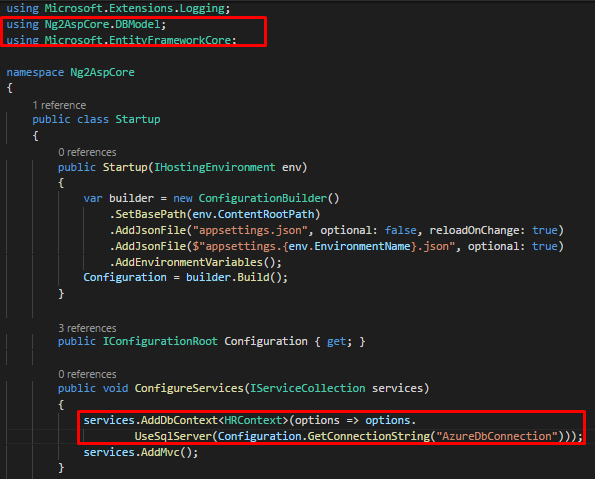
We should change Startup.cs file to add HRContext class as a service for Dependency Injection approach and specify the SQL server connection, which will be consumed by HRContext:
using Ng2AspCore.DBModel;

using Microsoft.EntityFrameworkCore;

…..

services.AddDbContext<HRContext>(options => options.UseSqlServer(Configuration.GetConnectionString("AzureDbConnection")));
The code is ready. Now, run the following command to create migration files:
dotnet ef migrations add HRContextMigration -c HRContext -o DBModel/Migrations
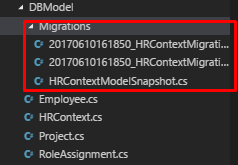
As a result, a “Migration” folder was created.
Run the following command to apply our migration files to the database:
dotnet ef database update –context HRContext
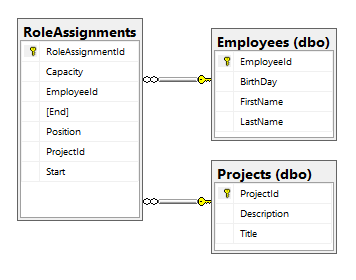
If we open the database now, we’ll see the new tables created after execution of this command and corresponding to the POCO classes.
Please note that you don’t necessarily need to start the database development from Code First classes. As an alternative, and if you already have a database, you can do a reverse engineering of an Existing Database as shown in Microsoft sample.
Filling DataBase Tables
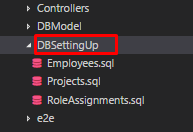
We created tables in our test database and it’s high time to put some data in there.
We’ve prepared some demo data, which you can find in the Git Repository:
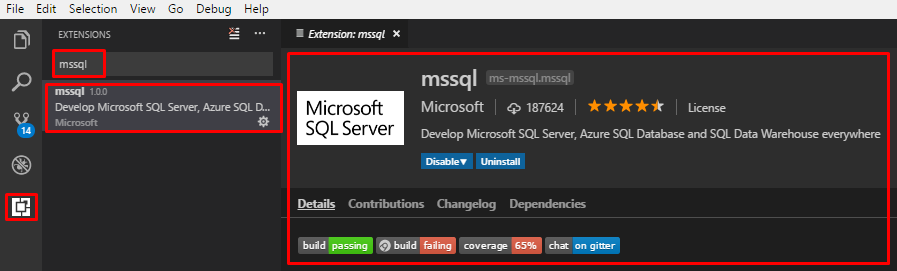
As we mentioned before, Visual Studio Code is a powerful cross-platform IDE, and it can be greatly enhanced with extensions. VS Code has a very nice mssql extension, which allows connecting to both Microsoft SQL Server database and Azure SQL database, and running SQL scripts:
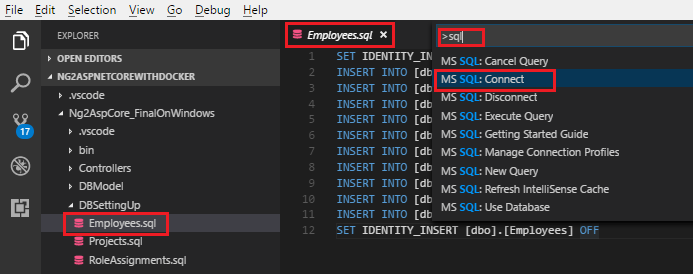
Employees.sql file contains INSERT instructions. To fill Employees table with demo data, press Ctrl+Shift+P and enter “mssql”. You will see a number of options, e.g., Connect, Execute Query and others:
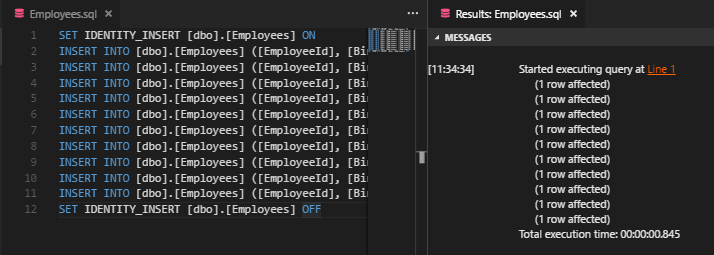
Select “MS SQL: Execute Query” option to execute the content of the Employees.sql file. You can see the response in the right part of the window. Execute the rest of the files in the same way:
Now, let’s deal with our back-end.
Back-End Part
Add a new “EmployeeController.cs” controller to the “Controller” folder:
using System;

using System.Collections.Generic;
using System.Linq;
using System.Threading.Tasks;
using Microsoft.AspNetCore.Mvc;
using Ng2AspCore.DBModel;


namespace Ng2AspCore.Controllers
{
    [Route("api/Employee")]
    public class EmployeeController : Controller
    {
        HRContext hrContext;
        public EmployeeController(HRContext hrContext)
        {
            this.hrContext = hrContext;
        }


        [HttpGet("GetAll")]
        public IActionResult GetAllEmployees()
        {
            var query = from emp in hrContext.Employees
                        join rm in hrContext.RoleAssignments on emp.EmployeeId equals rm.EmployeeId
                        where rm.Position == "Software developer"
                        select emp;
            return Ok(query.ToList());
        }
    }
}
In the GetAllEmployees method, we run a LINQ to SQL query to make all employees involved in any project labeled as “Software Developers”.
Front-end part
Now we are ready to create a front-end part of our application based on Angular 4 to display received data.
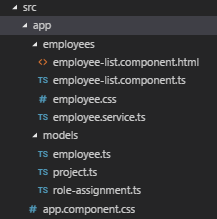
Download “employees” and “models” folders with Angular 4 code from the Git Repository and add them to app folder.
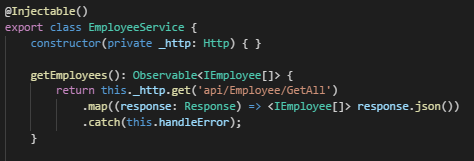
Let’s review some of them. The employee.service.ts file is a typical service ready to dependency injection, which processes api/Employee/GetAll endpoint response:
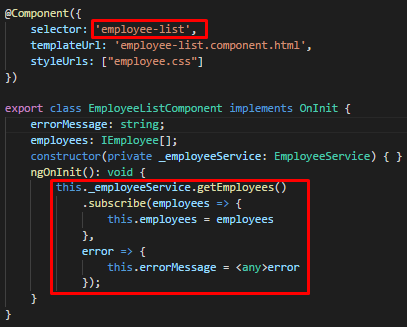
The employee-list.component.ts code contains a subscription to the observation channel from the service above:
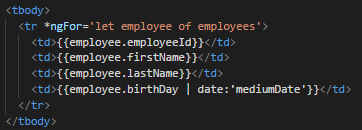
In the employee-list.component.html file, you can see an “ngFor” structural directive, required to iterate an array of obtained employees, and a “date” pipe:
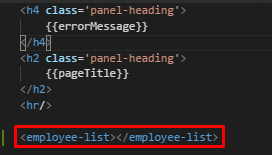
Finally, you need to add “selector” from employee-list.component.ts file to app.component.html file
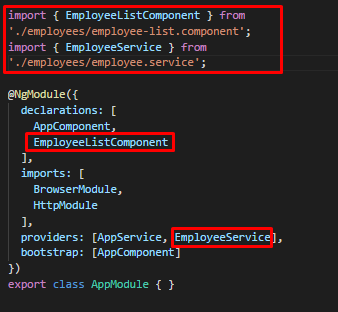
Don’t forget to register the component and the service in app.module.ts:
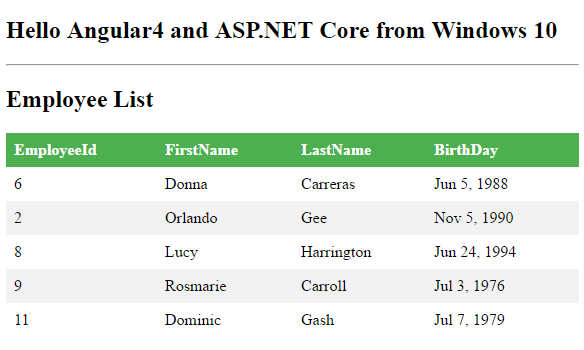
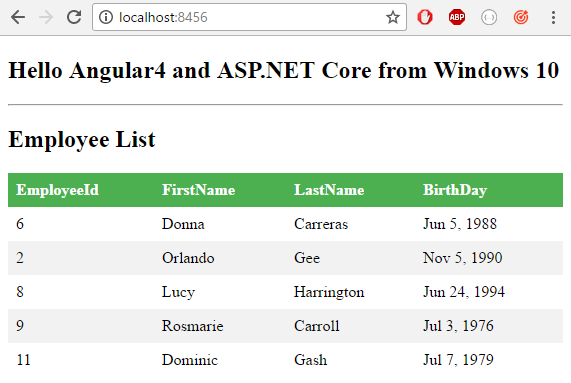
Our application is ready. Execute webpack command to re-bundle changed TypeScript files and run dotnet run command to rebuild and run .NET Core application on Kestrel server. You should see the same page in a browser as shown below. Note, that the people in the table are “Software developers”:
Now let’s move your app to the Docker container. But first, we need to go through some basics.
Docker Basics
Docker is a software to automate the deployment and management of applications in the virtualization environment at the operating system level. In other words, Docker is a “sandbox” for your application. Most resources refer to Docker as “a platform for containers”. If you haven’t worked with Docker before, it may be difficult to understand the concept of a container. Let’s assume that you’re at least somewhat familiar with VM concept.
Let’s quickly go through the main differences between VM and Container:
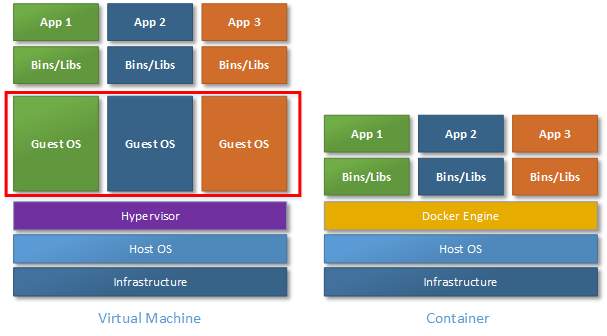
As you can see in the example above, the main difference between VM and Container is that the container doesn’t have a guest OS as a layer. VM cuts out the memory of host machine for own needs. Container shares memory with your host OS. Eventually, the container is much more lightweight than VM. However, if you need a totally isolated OS, you should use a VM.
If you are ready, let’s jump to making a Docker container.
Create Dockerfile and Container
A Dockerfile is a script, containing a set of commands required to setup a container. Docker platform uses this file to assemble a Docker image when you run a Docker build. To create a Dockerfile, you will need to create a text file with exact “Dockerfile” name and remove the file extension.
Create a Dockerfile in the root of your project and insert the following code into it:
FROM microsoft/aspnetcore:1.1
ARG source=.
WORKDIR /app
EXPOSE 80
COPY $source .
ENTRYPOINT ["dotnet", "Ng2AspCore.dll"]
Let’s review each instruction one by one:
- FROM instruction sets microsoft/aspnetcore:1.1 image as the base image for subsequent instructions. This instruction starts pulling microsoft/aspnetcore:1.1 image from the Public Repositories, but you can use any other image from any repository as a starting one. Please note that the digits in the microsoft/aspnetcore:1.1 are a “tag”, showing us the version of .NET Core, which we used in a container. You might be using a newer version of .NET Core, hence the tag can be different.
- ARG instruction sets a variable that users can pass to the docker build command. In the file above, we specified a default value for this instruction.
- WORKDIR instruction sets the working directory for ENTRYPOINT and COPY instructions, which we use in our Dockerfile.
- EXPOSE instruction informs Docker that the container listens on the specified network ports at runtime. In our case, we are listening on Port 80.
- COPY instruction copies directories or files and pastes them to the filesystem of the container. We’ll copy the files from the directory, where the Dockerfile is stored, to the root of the container.
- ENTRYPOINT instruction adjusts a container to run as an executable. In our instruction, it’s the same as dotnetdll in .NET Core CLI.
Now, our dockerfile is stored in the root of the project.
However, according to the ENTRYPOINT instruction, Docker has to execute Ng2AspCore.dll. We can copy the Dockerfile to the target folder, which contains the expected .dll file OR change WORKDIR or COPY instructions.
In the following example, we’ve selected the first way. To copy the Dockerfile automatically after each build, let’s change the behavior of Dockerfile within the project.
Open *.csproj file and change the information about Dockerfile:
<ItemGroup>
    <None Update="Dockerfile">
      <CopyToOutputDirectory>Always</CopyToOutputDirectory>
    </None>
  </ItemGroup>
Currently, everything is ready to build the project and the Docker container. Go to the root of the project and run these commands:
dotnet build

dotnet publish
Now you can open the directory, where a dll file has been created:
<your project path>bin\Debug\netcoreapp1.1\publish
The dll and Dockerfile files are located in this directory.
Now we ready to build our own project specific container:
docker build bin\Debug\netcoreapp1.1\publish -t ng2aspcorecontainer
where “bin\Debug\netcoreapp1.1\publish” is the path to the Dockerfile and “-t” is the name of the container.
Run the following command:
docker run -it -d -p 8123:80 ng2aspcorecontainer
where “-it” places an interactive tty (a text input-output environment like a shell) to the Docker container; “-p” binds to Port 80 (the port we defined in the EXPOSE instruction) of the container to Port 8123 on localhost of the host machine; and “-d” starts the container in detached mode. This means that the container exists while exists the root process, which is used to run the container.
Finally, we’ve built our Docker container and it’s up and running. You can check its status by executing the docker ps command.
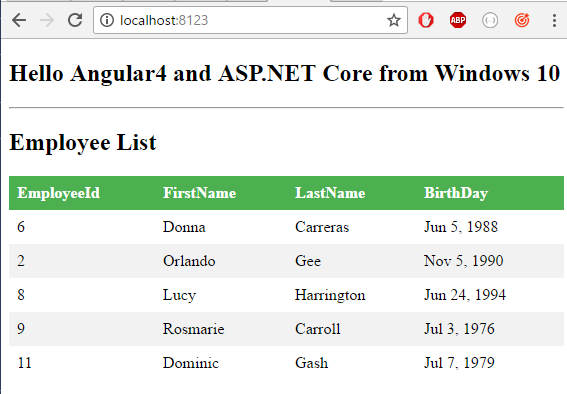
Now let’s check it’s status – go to http://localhost:8123/ where Port 8123 is the one, which we previously defined in Docker run command.
Docker repository
Now we need to put our freshly created image to the Docker hub (a set of repositories). Go to https://www.docker.com/ and sign in or create your account. Docker hub is similar to GitHub repository. You can place your image on the hub and use it wherever you want.
Run the following command in the shell to login to your repository:
docker login
Next, create a tag <your repository name>/<image name>:<tag> that refers to ng2aspcorecontainer (the source image)
docker tag ng2aspcorecontainer bastiuchenko/ng2aspcorecontainer:version1
Now, you can publish your Docker image:
docker push bastiuchenko/ng2aspcorecontainer:version1
The image has been placed in your repository as seen in the example below:

Let’s check if your container can run from the repository. Execute the following command:
docker run -p 8456:80 bastiuchenko/ng2aspcorecontainer:version1
Check the result in a browser:
Now, one more step left – moving all that to Azure.
Host container in Azure
Our application was working locally. Let’s run it in Azure to make it available anywhere.
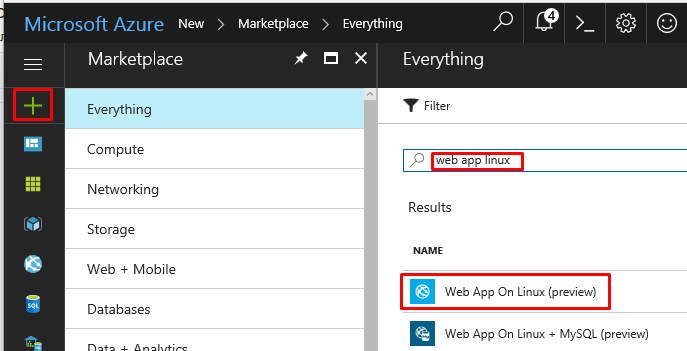
Go to Azure Portal, press the big plus on the left panel and select “Web App On Linux” option:
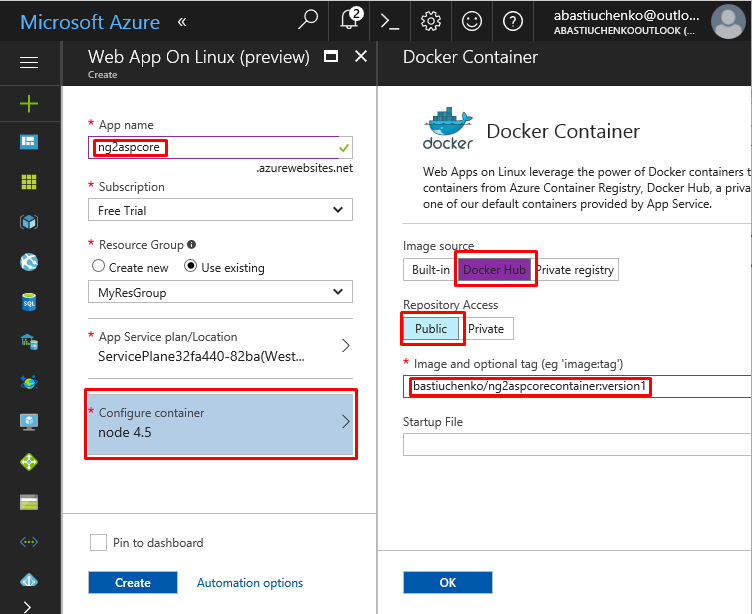
Enter your Web App name, press “Configure container” and select “Docker Hub”. We pushed our image to a public (free) repository, so we selected “Public” option on the screen below. You can also select a private repository in the previous step.
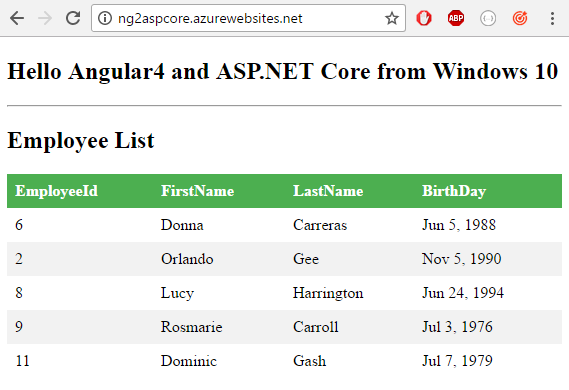
Go to http://<app name>.azurewebsites.net and you will see the same output, as during the local test:
You can find the final version of this proof of concept in GitHub repository. As always, feel free to comment or contact us if you have any questions.
In the next part of our tutorial, we are creating an ASP.NET Core + Angular 4 application with the connection to MongoDB in Ubuntu and talking about interoperation between Docker containers.
What is ASP.NET Core?
ASP.NET Core is a Microsoft open source cross-platform framework for creating web- and cloud-based server applications. It was born from a substantial re-design of ASP.NET to become an amazingly fast and modular tool for app developers.
![Power Apps Licensing Guide [thumbnail]](/uploads/media/thumbnail-280x222-power-apps-licensing-guide.webp)
![How to Build Enterprise Software Systems [thumbnail]](/uploads/media/thumbnail-280x222-how-to-build-enterprise-software-systems.webp)
![Super Apps Review [thumbnail]](/uploads/media/thumbnail-280x222-introducing-Super-App-a-Better-Approach-to-All-in-One-Experience.webp)
![ServiceNow and Third-Party Integrations [thumbnail]](/uploads/media/thumbnail-280x222-how-to-integrate-service-now-and-third-party-systems.webp)
![Cloud Native vs. Cloud Agnostic [thumbnail]](/uploads/media/thumbnail-280x222-cloud-agnostic-vs-cloud-native-architecture-which-approach-to-choose.webp)
![DevOps Adoption Challenges [thumbnail]](/uploads/media/thumbnail-280x222-7-devops-challenges-for-efficient-adoption.webp)
![White-label Mobile Banking App [Thumbnail]](/uploads/media/thumbnail-280x222-white-label-mobile-banking-application.webp)

![Mortgages Module Flexcube [Thumbnail]](/uploads/media/thumbnail-280x222-Secrets-of-setting-up-a-mortgage-module-in-Oracle-FlexCube.webp)
![Challenges in Fine-Tuning Computer Vision Models [thumbnail]](/uploads/media/thumbnail-280x222-7-common-pitfalls-of-fine-tuning-computer-vision-models.jpg)