
Tutorial: Creating basic ASP.NET Core + Angular 4 application in Windows 10
List of Related Tutorials:
In this first part of our tutorial, we’ll talk about creating a basic Angular 4 and ASP .NET Core application in Windows 10 Environment.
Introduction
To create our sample cross-platform application, we’ll be using the following technologies:
- .NET Core – a platform developed and maintained by Microsoft, and which can compile, debug C# code and work on Windows, Linux or Mac. We will use it to write a .NET Core + Angular 4 application.
- Angular 4 – one of the most popular front-end frameworks developed and maintained by Google. We will use it to create a dynamic and attractive web interface. This new version of the framework (just like the previous one – Angular 2) is based on TypeScript developed and maintained by Microsoft.
- TypeScript – a strict syntactical superset of JavaScript which allows teams to write software code faster, following best practices and getting a unified coding style. As a result, such code is simple and easier to support.
- Webpack 2 – a module bundler, which allows us to minify and bundle a JavaScript code, and allows to implement Tree Shaking.
- Microsoft SQL – a relational database management system developed by Microsoft. In this solution, we will use Azure SQL Database to increase the portability of our solution.
- MongoDB – one of the most popular NoSQL databases. We will use it as an alternative to the SQL database (Microsoft SQL) to cover more data store scenarios.
- Visual Studio Code (VS Code) – a lightweight cross-platform IDE to write C# and front-end code.
Now, we will start creating our web application step by step in Windows 10 environment and continue developing on Ubuntu.
Please note that your machine should have the latest versions of Node.js and .NET Core SDK and Runtime installed.
Starting Angular 4 project
Creating an initial Angular 4 + Webpack solution is a complicated process, and it gets even more complicated as new software is released and you need to change your approach on the fly. Thus, we suggest using Angular CLI (a command line interface for Angular) to streamline this process.
Let’s start with installing Webpack and Angular CLI.
If you already have Webpack on your computer, we’d recommend to reinstall it from scratch to make sure you’re using the latest version:
npm uninstall -g webpack
npm rm webpack -g
Install Webpack again:
npm install webpack -g
The same is relevant for Angular CLI – if you have it installed, make sure to use the latest version:
npm uninstall -g @angular/cli
npm rm @angular/cli –g
Reinstall Angular CLI once again:
npm install @angular/cli -g
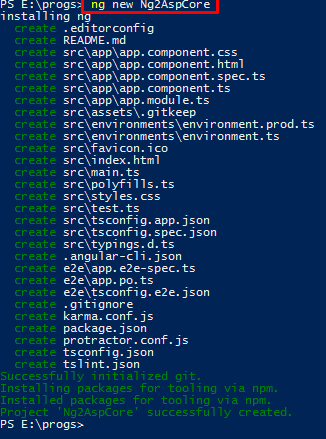
Now let’s create a new project:
ng new Ng2AspCore
You should see a response as shown on the screen below:
Move to the newly created project folder:
PS E:\progs> cd Ng2AspCore
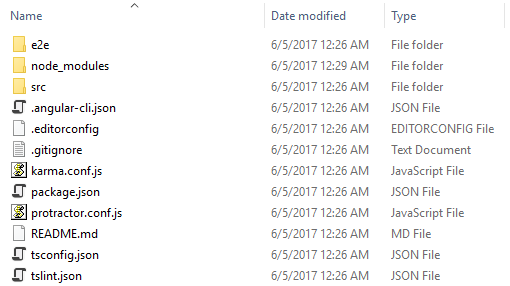
You can also view it in Explorer:
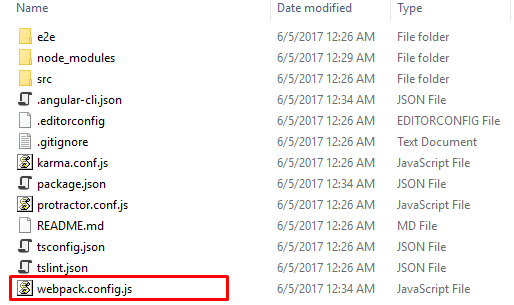
Initially, Angular CLI puts a webpack.config.js config file in the node_modules/webpack folder and doesn’t allow to configure it.
We need to extract webpack.config.js to the root of the project in order to configure it:
PS E:\progs\Ng2AspCore> ng eject
Now we can see the file:
The initial Angular 4 project is now ready.
How to create a .NET application
Now we need to add a .NET Core project:
PS E:\progs\Ng2AspCore> dotnet new webapi

Highlighted in red are the project files. The .NET Core project was successfully created.
Webpack Adjustment
Both projects have been created but they don’t interact with each other yet. Actually, we should put static files in .NET Core content root folder – wwwroot. We need to adjust Webpack to put bundled files to the wwwroot folder.
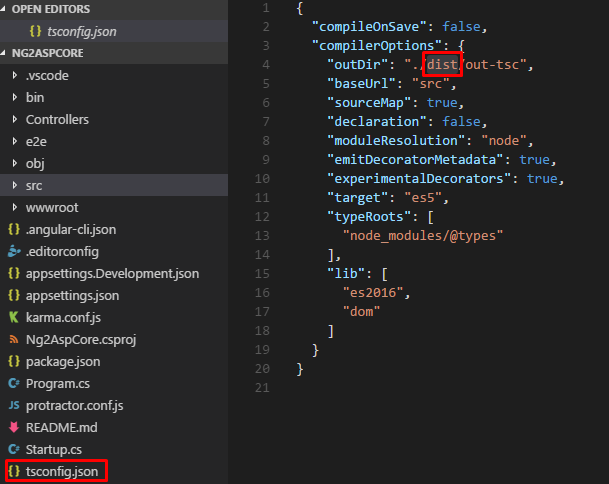
Let’s open our project folder in VS Code. Open file webpack.config.js and find the “dist” directory as seen below:

Replace:
“path”: path.join(process.cwd(), “dist”),
…with:
“path”: path.join(process.cwd(), “wwwroot”),
You also can change outDir as shown below:
.NET Core project adjustment
Visual Studio Code is a powerful cross-platform IDE that can be enhanced by extensions to make it even more effective.
To work with .NET Core, you will need to add a C# extension to Visual Studio Code.

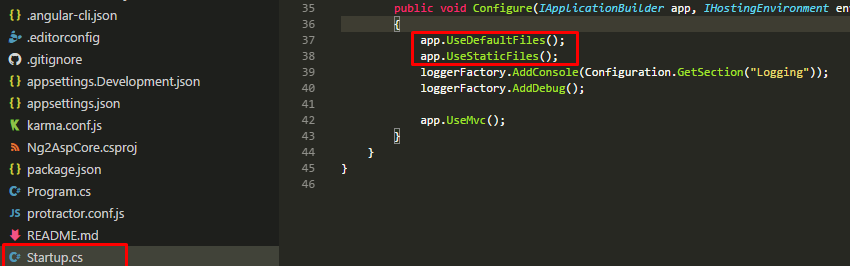
Our .NET Core doesn’t use static files yet and we will solve this issue now, step by step. Add the following row to the Config method in Startup.cs file to use default files like the index.html:
UseDefaultFiles();
Now, add the following row to Config method in Startup.cs file to use static files from wwwroot:
UseStaticFiles();
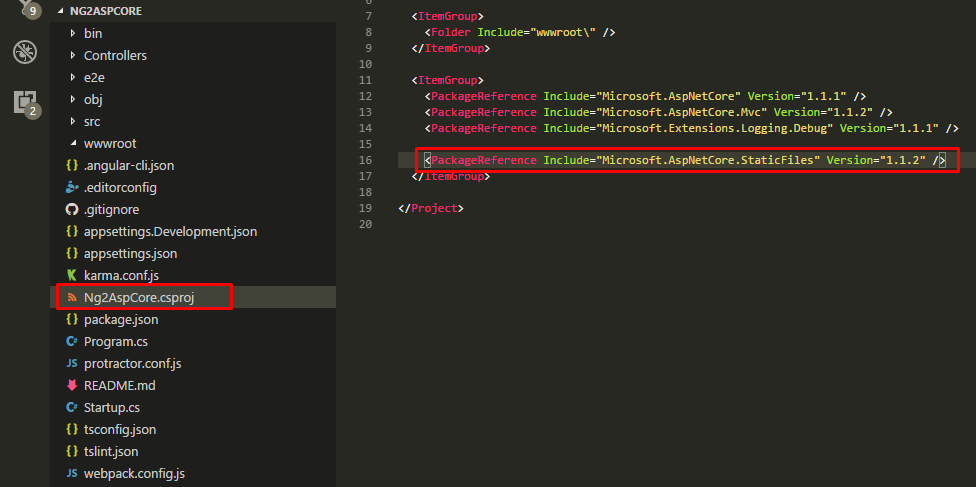
Put the following row to the *.csproj project to add a reference to the library, which will allow to support the rows that we added above:
<PackageReference Include=”Microsoft.AspNetCore.StaticFiles” Version=”1.1.2″ />
Don’t forget to save all edited files. If you noticed that your code in *.cs files is underlined as error – just execute dotnet restore command in PowerShell to restore packages and references, which you specified in the *.csproj file.
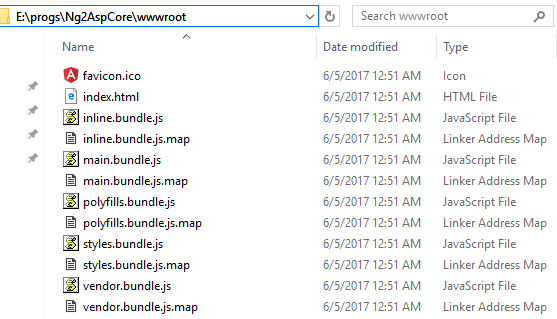
Now let’s check if Webpack works as expected. Run the following command to transpile the TypeScript code to JavaScript code, then bundle, minify and put this code in the destination folder:
PS E:\progs\Ng2AspCore> webpack
Now we can see that all expected files appeared in the wwwroot folder:
Writing App Code
Let’s send a really simple message from our back-end and display it in the browser.
Open “Controllers” folder and add a new file called “HelloController.cs”. You will see the following menu:
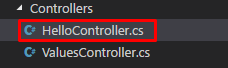
Embed the following code into the file:
using System;
using System.Collections.Generic;
using System.Linq;
using System.Threading.Tasks;
using Microsoft.AspNetCore.Mvc;
namespace Ng2AspCore.Controllers
{
    [Route("api/hello")]
    public class HelloController : Controller
    {
        [HttpGet]
        public IActionResult Get()
        {
            return Ok("Hello Angular4 and ASP.NET Core from Windows 10");
        }
    }
}
Explanation: there are two types of routing – conventional routing and attribute routing. We use RouteAttribute (attribute routing) to define a routing. You can also use Configure method in Startup class to define a routing (conventional routing) but RouteAttribute is a preferable way to do it. In HelloController class we return just a simple string “Hello Angular4 and ASP.NET Core from Windows 10” to show that it really works. Further in this tutorial, we will create a more useful sample.
Now our endpoint is ready. You can execute dotnet run command and go to http://localhost:5000/api/hello in a browser to test it.
Further, we’ll request this endpoint in our front-end part in order to return a response on the page.
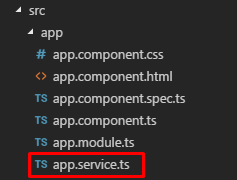
Create a new app.service.ts file in src/app folder.
Insert the following code into the file:
import { Injectable } from ‘@angular/core’;
import { Http, Response } from ‘@angular/http’;
import { Observable } from ‘rxjs/Observable’;
import ‘rxjs/add/operator/catch’;
import ‘rxjs/add/operator/map’;
import ‘rxjs/add/observable/throw’;
@Injectable()
export class AppService {
    private _serviceUrl = 'api/hello';

    constructor(private _http: Http) { }

    sayHello(): Observable   {
        return this._http.get(this._serviceUrl)
            .map((response: Response) => {
                return response.text();
            });
    }
}
Explanation: we have defined a new TypeScript class and tagged it by @Injectable decorator to use it as dependency injector. In this class, we’ve got just one method that opens a communication channel in which response of the endpoint can be emitted. For this purpose, we use the “Observable” class.
Open app.module.ts file and add “AppService” to the file. Then import HttpModule:
import { BrowserModule } from '@angular/platform-browser';
import { NgModule } from '@angular/core';
import { HttpModule } from '@angular/http';
import { AppComponent } from './app.component';
import { AppService } from './app.service';
@NgModule({
  declarations: [
    AppComponent
  ],
  imports: [
    BrowserModule,
    HttpModule
  ],
  providers: [AppService],
  bootstrap: [AppComponent]
})
export class AppModule { }
Now, change the code of app.component.html file to the following:
    {{errorMessage}}

    {{pageTitle}}
Change the code of the app.component.ts file to the following:
import { Component, OnInit } from '@angular/core';
import { Http, Response } from '@angular/http';
import { AppService } from './app.service';
@Component({
  selector: 'app-root',
  templateUrl: './app.component.html',
  styleUrls: ['./app.component.css']
})
export class AppComponent implements OnInit {
  pageTitle: string = '';
  errorMessage: string = '';

  constructor(private _appService: AppService) { }
    ngOnInit(): void {
        this._appService.sayHello()
            .subscribe(result => {
                this.pageTitle = result;
            },
            error => {
                this.errorMessage = error
            });
    }
}
Explanation: we have added an OnInit interface like a lifecycle hook to this file and ngOnInit method from this interface in order to call the code when data-bound properties of a directive will be initialized. In this method, we have subscribed to the observable channel from AppService.
Launching the Application
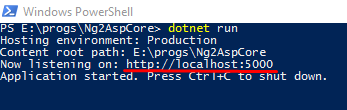
To launch your application, simply execute the following commands:
- webpack
- dotnet restore – to restore all .NET Core packages
- dotnet run – to run your application on Kestrel web server
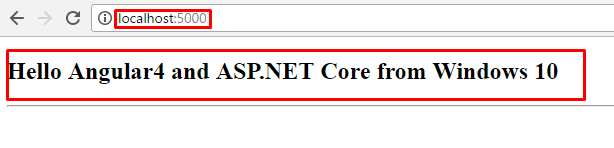
Now you can go to http://localhost:5000/ URI, as suggested by console:
You will see the following web page in your browser, as shown below:
We’ve uploaded the final version of this simple proof of concept to the GitHub repository. Enjoy the tutorial and let us know if you have any questions or comments.
In the second part of our tutorial, we are talking about creating an ASP.NET Core + Angular 4 application in Docker container with the connection to SQL Azure Database. Stay tuned!
![Pros and Cons of CEA [thumbnail]](/uploads/media/thumbnail-280x222-industrial-scale-of-controlled-agriEnvironment.webp)
![BPO in Telecom and BFSI [Thumbnail]](/uploads/media/thumbnail-280x222-ways-business-process-outsourcing-bpo-can-help-telecom-bfsi-and-other-industries-advance.webp)
![Cloud-Native Maturity Model Assessment [thumbnail]](/uploads/media/thumbnail-280x222-what-Is-the-cloud-native-maturity-model-definition-and-assessment-criteria.webp)
![Power Platform for Manufacturing [Thumbnail]](/uploads/media/thumbnail-280x222-power-platform-for-manufacturing-companies-key-use-cases.webp)

![Containers vs VMs for Microservices [thumbnail]](/uploads/media/thumbnail-280x222-containers-vs-vms-what’s-better-for-microservices.webp)
![Accelerated Development with Azure DevOps Toolset [thumbnail]](/uploads/media/thumbnail-280x222-how-to-improve-developer-velocity-with-azure-devops.webp)
![10 Lessons Learned: AWS Migration [Thumbnail]](/uploads/media/thumbnail-280x222-10-lessons-learned-on-aws-migration.webp)
![Cloud FinOps Implementation Roadmap [Thumbnail]](/uploads/media/thumbnail-280x222-cloud-finops-why-you-need-it-and-how-to-get-started.webp)
![Challenges of Low-code vs Custom [TN]](/uploads/media/thumbnail-280x222-how-to-overcome-the-challenges-of-low-code-and-custom-solutions-development-expert-advice.webp)